
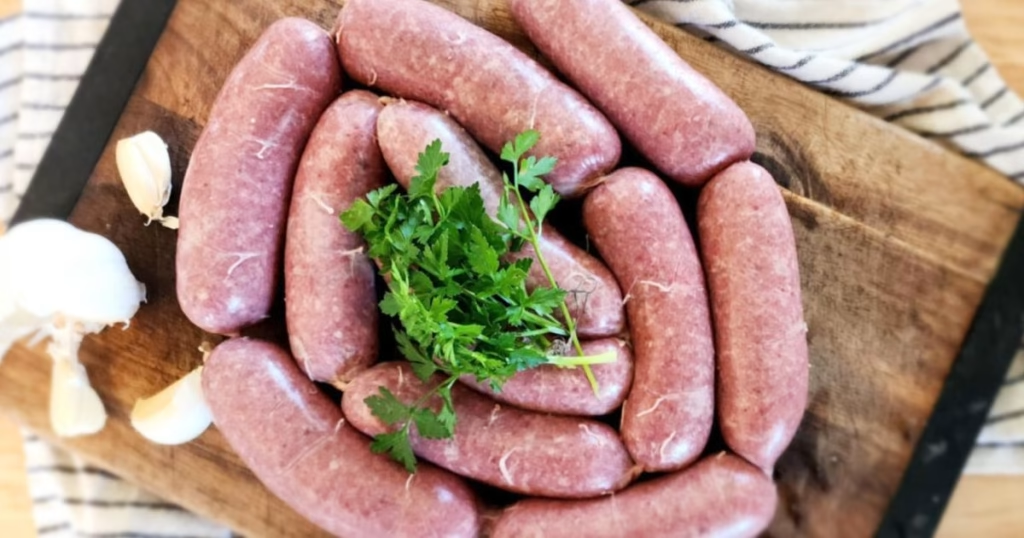
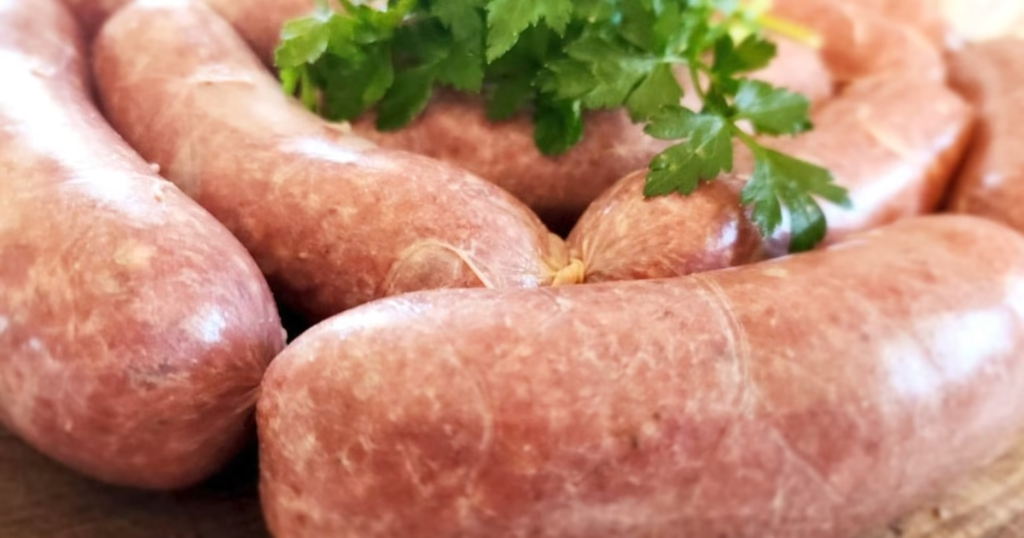
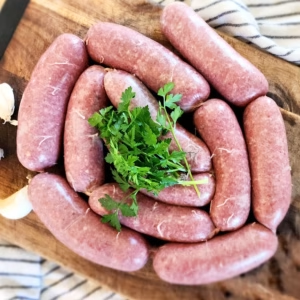
Made with organ meats, collagen-rich scraps, and any beef cuts you like, these nose-to-tail homemade beef sausages are a true staple in my freezer. Nutritious, delicious, and incredibly affordable, they make a hearty meal and a wonderful ingredient for many recipes.
Disclosure: as an Amazon Associate, I earn a small commission from qualifying purchases at no extra cost to you. Read my full Disclosure and Policy here.
Eating nose-to-tail has been a real game changer for me. It’s not only improved my health thanks to all those extra nutrients, but also helped me discover new (and surprisingly delicious) flavors, while saving money and reducing waste.
Whether you butcher your own animals, buy in bulk from local farms, or simply shop at the grocery store, these homemade beef sausages are a perfect way to enjoy more organ meats and make the most of every part of the animal.
If you’re new to this journey of eating all the “unusual” parts, make sure to read my posts on the benefits of nose-to-tail eating and organ meats explained, and browse through my collection of organ meat recipes. Some of my favorites and most popular recipes include pan-fried beef liver, pan-seared beef heart, Instant Pot beef tongue, beef heart stew, and my classic grain-free steak and kidney pie. And if you want a variation on this recipe, try my organ meat breakfast sausage.
Why You’ll Love This Recipe
These homemade beef sausages are as nourishing as they are satisfying. They’re rich in protein, healthy fats, collagen, and essential vitamins and minerals, all with all the classic flavor and comfort of a good rustic sausage! Because they use organ meats and fat scraps, they’re packed with nutrients like iron, zinc, B12, and vitamin A, essential nutrients that are often missing from modern diets. They’re also grain-free, and sugar-free!
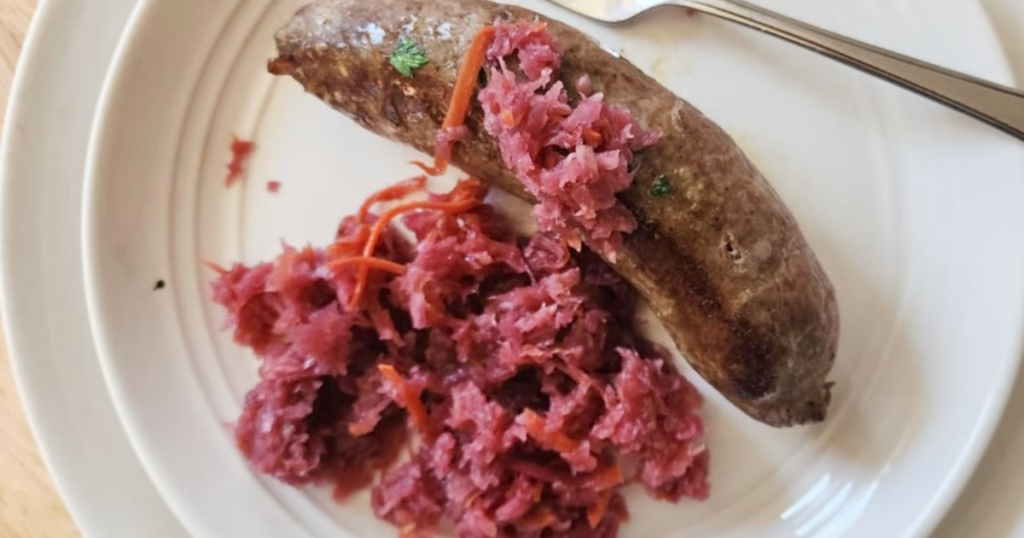
You’ll also love how simple and versatile this recipe is. Once you’ve made your sausage mix, you can shape it into patties, stuff it into casings, or crumble it for soups, stews, or sauces. The flavor is hearty and rich, and it pair really well with a light side of probiotic-rich fermented coleslaw, sauerkraut, or fermented onions, or with some classic roasted or mashed potatoes. You can also include them in hearty stews or soups, or use them as stuffing.
Advantages of Making Your Own Sausages
Making your own sausages at home is one of the most rewarding things you can do in the kitchen. What I love most is that you have full control over the ingredients. Homemade sausages contain no fillers, preservatives, or mystery meats, making them a much healthier choice than their store-bought counterparts. You can tailor the seasonings to your own taste and easily avoid ingredients you don’t want, like added sugars, grains or seed oils.
I honestly rarely buy store-bought sausages anymore. Why? Price and ingredients. Finding good-quality sausages that don’t break the bank has become almost impossible! Making my own healthy sausages is at least three to four times cheaper and saves me hundreds of dollars a year. You don’t even need fancy equipment: a simple, affordable meat grinder with a stuffing attachment will serve you well for years (mine certainly has!).
If you save your meat trimmings (like heart, liver, collagen-rich, or fatty scraps from other recipes) you’ll save even more while reducing waste. These nose-to-tail sausages are a wonderful way to be more resourceful and truly honor the whole animal, while making a sausage that’s full of beneficial nutrients and collagen. They freeze beautifully, so you can always have a nutrient-rich, ready-to-cook meal on hand.
And if you’re looking for a lighter version perfect for breakfast, check out my organ meat sausage patties, another simple, nourishing staple I always keep stocked.
Ingredients for These Nose-to-Tail Beef Sausages
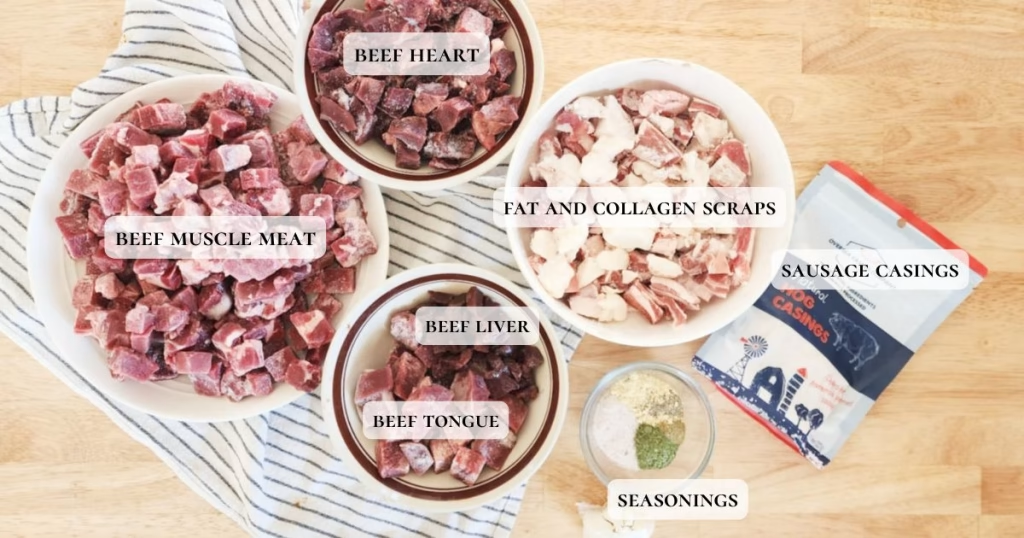
Beef muscle meat. This will make up the bulk of your sausages. You can use almost any cut of beef, cheap cuts are the most cost-effective and work wonderfully here (I used some inside round roast). If you’re using marbled meat, slightly increase the amount of meat and reduce the added fat to balance things out.
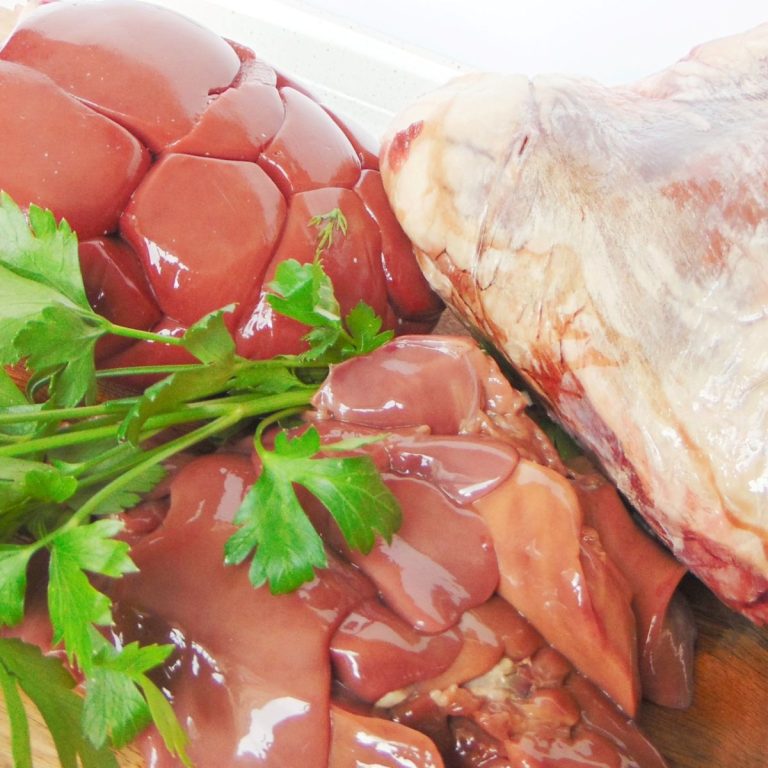
Beef heart. Beef heart tastes and feels much like regular muscle meat but is packed with nutrients and antioxidants. Use a couple of slices of heart or toss in all those trimmings from other recipes like pan-seared beef heart or stuffed beef heart. All the collagen-rich vessels and membranes you usually trim away are perfect here as they’ll be minced up during grinding anyway.
Beef tongue. Adds richness, collagen, and a wonderful depth of flavor. To prepare, remove the outer skin with a sharp knife, then use the rest of the tongue. The tip, which tends to be a bit tougher, is excellent for sausages.
Beef liver. The king of all organ meats, and the most nutrient-dense food on earth. A small amount adds a ton of nutrition without overpowering the flavor. For easier grinding and a better texture, cut and grind it while partially frozen. Rinse off any excess blood under cool water and pat dry before using, if necessary.
Beef kidney. Another nutrient powerhouse, but a little goes a long way. Use the meaty part and keep some of the inner fat (weigh it together with your other fats). For a guide on how to clean kidneys, refer to my pan-fried beef kidneys recipe. If you don’t have kidneys or prefer not to use them, you can substitute with more liver, or simply omit.
Beef fat and collagen trimmings. For the fat component, use whatever you have: beef suet (the pure fat around the kidneys), fat trimmings, heart fat, or even fat from pork or lamb. If using pure fat only, about 1 lb is perfect. You can also include collagen-rich scraps for extra nutrition and flavor. Often, fat and collagen come together naturally in trimmings, which is why I combine them here. I used a mix of beef suet and some lamb stew pieces that were mostly fat and hard collagen. If using a mix of fat and collagen scraps, increase the total to about 1½ lbs.
Salt. Use a good quality mineral salt such as Redmond Real Salt, about 4 to 5 teaspoons for this batch.
Seasoning. Feel free to use your favorite sausage seasoning blend or make your own with spices and herbs you enjoy. I like to keep mine simple and not too spicy: two cloves of garlic, 2 teaspoons of black pepper, and 1 teaspoon each of dried sage, parsley, and mustard seeds. You can also add onion (powdered or finely chopped), cayenne, fennel, rosemary, or thyme, whatever suits your taste. Some like to add sugar and/or a splash or vinegar to their sausages as well.
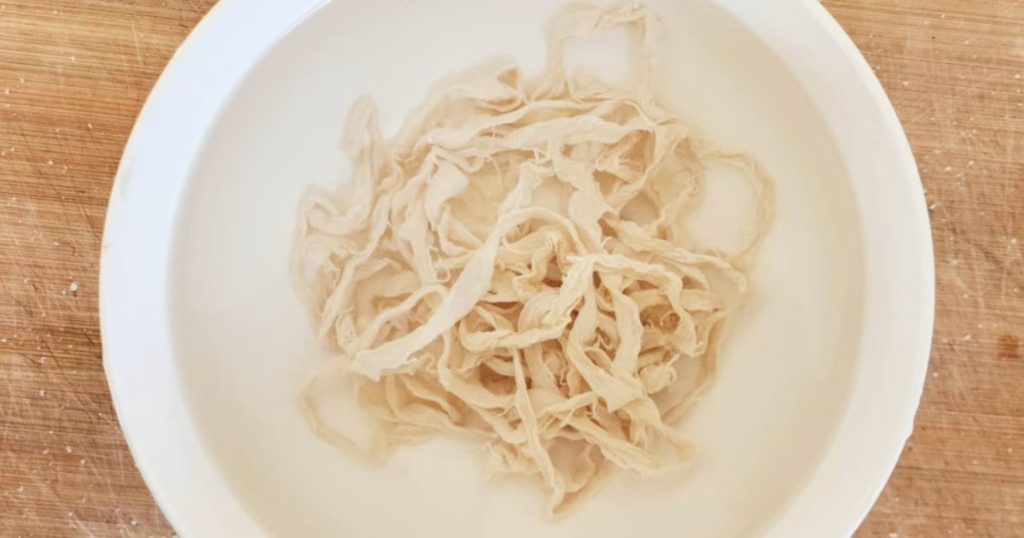
Sausage casings (optional). If you plan to stuff your sausages, you’ll need casings. After trying a few, I love natural hog casings because they’re easy to use, don’t tear easily, are all natural, and give the best texture. I use this Canadian brand that comes in salt. When buying, consider the sausage size you want and make sure the casings fit your stuffer or grinder attachment.
Tools You May Need
Cutting board and knife(s).
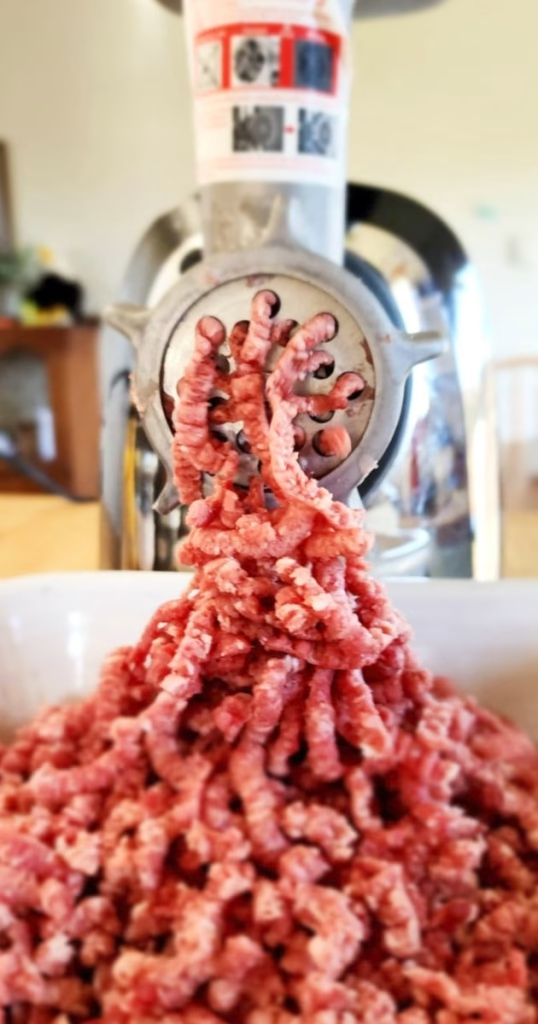
Meat grinder. An electric one will make the process easier and faster. An affordable meat grinder like this one is all you need!
Large mixing bowls.
Sausage stuffer or stuffer meat grinder attachment (optional, if making links).
Needle or sausage pricker (optional, if making links).
How to Make These Nose-to-Tail Beef Sausages
Make the sausages
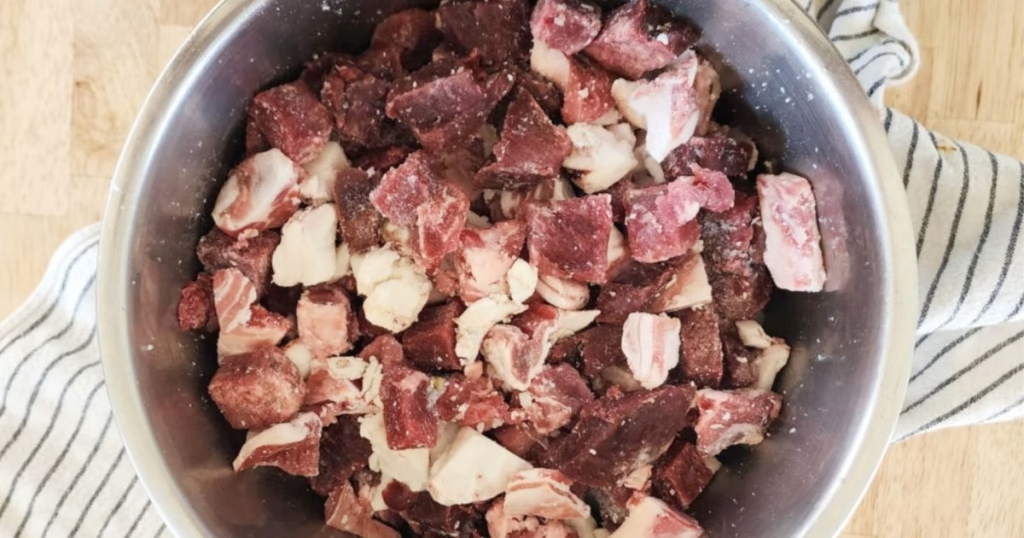
Step 1: Gather and prepare all your ingredients. Weigh the different types of meats and fat, then cut everything into roughly 1-inch cubes. If your meat isn’t already partially frozen, spread the cubes on a tray and place them in the freezer until firm but not completely solid (about 1 hour). Place all your clean bowls and grinder parts in the fridge or freezer to chill as well.
Step 2: While you wait, weigh and prepare your seasonings. If using fresh garlic, mince it finely.
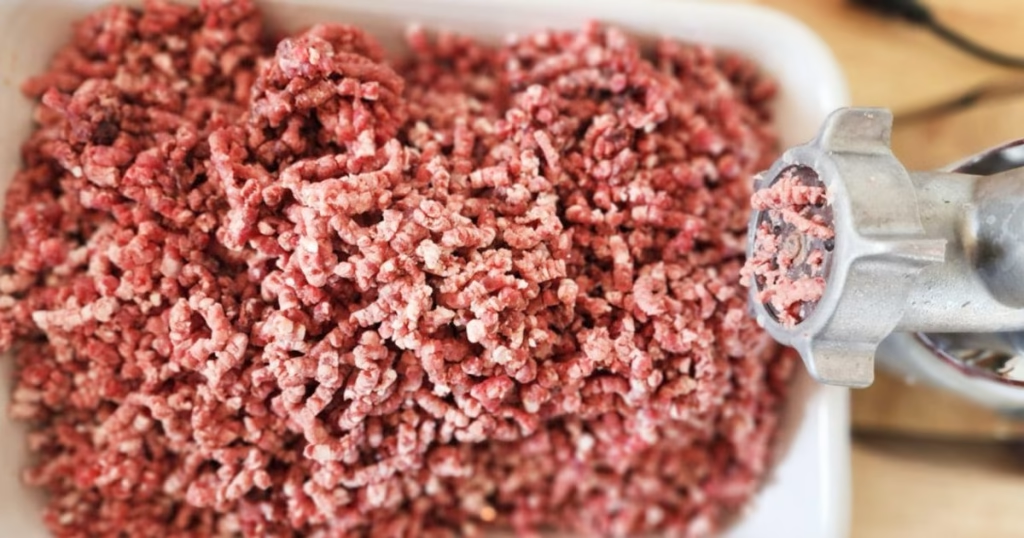
Step 3: Assemble your meat grinder with the chilled parts, following the manufacturer’s instructions. Use a coarse or medium die for grinding.
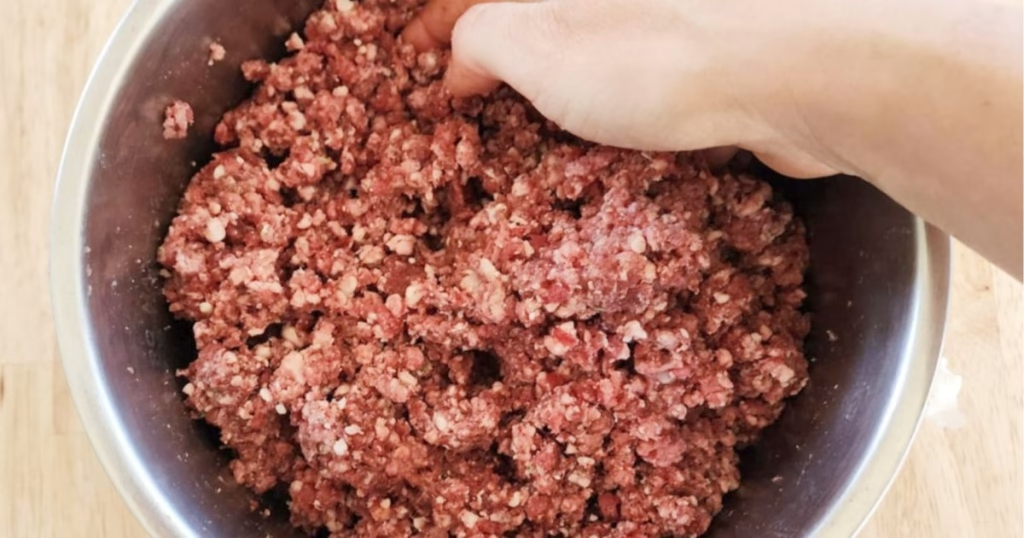
Step 4: Remove the meat and fat from the freezer and combine them in a large, cold bowl. Mix with clean hands to evenly distribute fat and organ meats.
Step 5: Grind all the meat, collecting it in a large, cold bowl or tray.
Step 6: Add the seasonings and mix quickly with clean hands to distribute everything evenly. Return the mixture to the fridge or freezer while you wash and sanitize your equipment and surfaces. Place your sausage stuffer parts in the freezer to chill, if using.
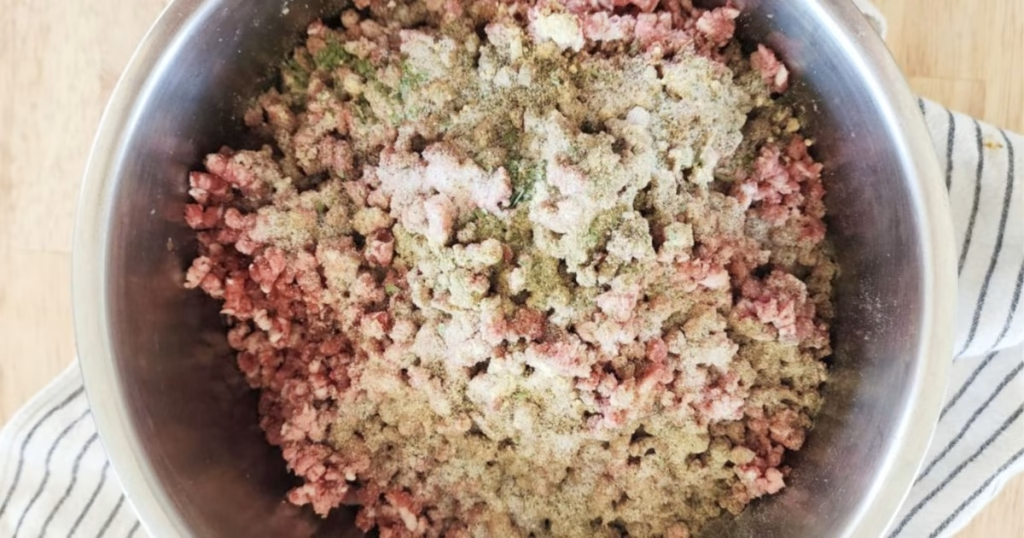
Step 7: Once everything is ready, mix the sausage mixture again until it becomes homogeneous and slightly sticky. You can mix by hand or use a stand mixer with a paddle or dough hook attachment.
Step 8: If you want to make stuffed sausages continue with the next section. If making patties, simply form the mixture into patties with clean, slightly damp hands and place them on a parchment-lined tray. Keep them refrigerated, cook immediately, or freeze (see notes).
Stuff into casings (optional)
Step 1: While the sausage mixture rests in the fridge or freezer, prepare your casings. For natural hog casings, rinse thoroughly and soak in warm water for about 15 minutes. Then run warm water through each casing to remove any salt and check for leaks. Follow the specific directions provided with your casings.
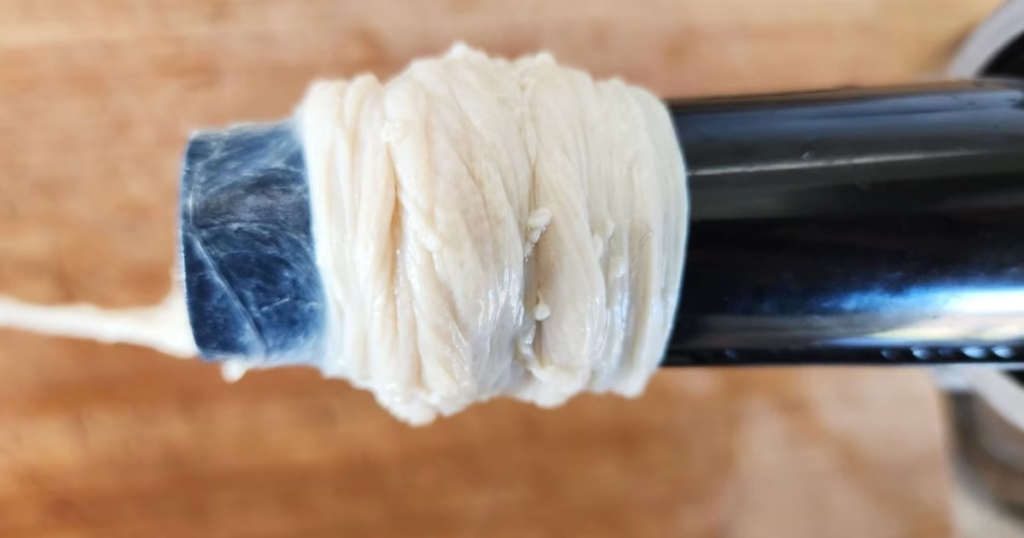
Step 2: Assemble your sausage stuffer, or use your grinder fitted with the stuffer attachment without the blade and die. Slip a casing all the way onto the stuffing tube, tie a knot at the end, and prick a small hole near the knot to let trapped air escape.
Step 3: Gently push the meat mixture through the stuffer, letting it fill the casing as it coils. Adjust the pressure or speed as needed: if air pockets form, decrease speed and/or push casing further in onto the stuffing tube; if it overfills, try increasing speed, and/or sliding the casing closer to the tube’s end.
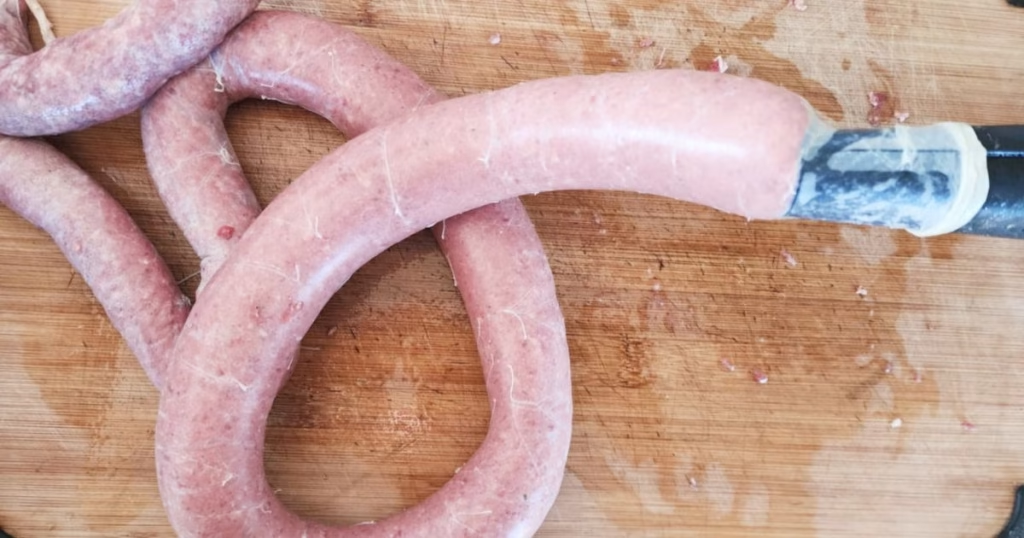
Step 4: Once you reach the end, leave enough casing to tie another knot. Form links at your desired length, alternating the direction of each twist to keep them secure.
Step 5: Prick any air bubbles with a sterilized needle or sausage pricker. Your sausages are now ready to cook, refrigerate, or freeze.
Notes
Uncooked sausages will keep in the fridge for up to 5 days.
To freeze, arrange patties or links in a single layer on a parchment-lined tray and freeze until solid. Then transfer them to a zip-top bag (you can cut links apart first) and store for up to 3 months.
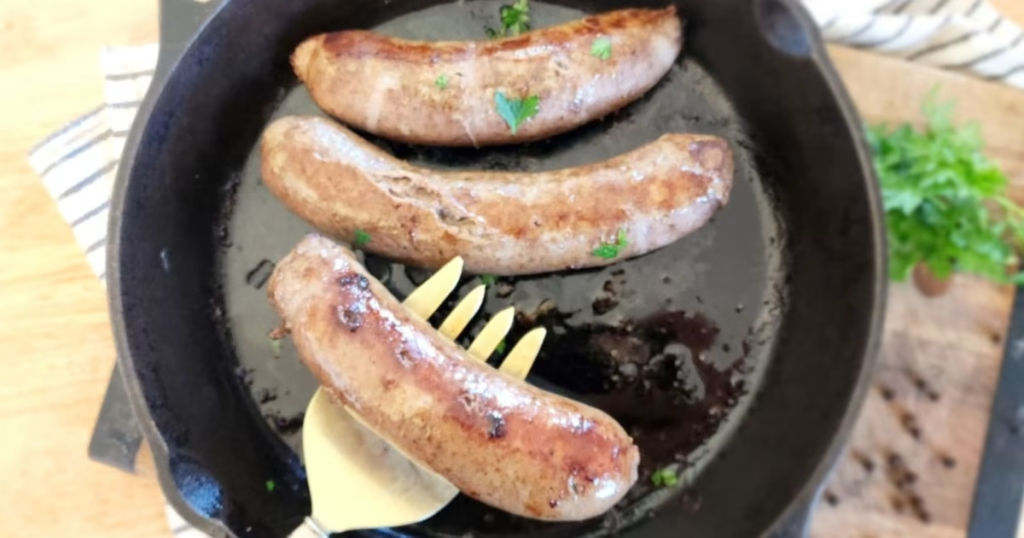
To cook these sausages: pan-fry, bake, grill, or simmer in stews and soups. Cooking time will vary with size, and sausages are done when browned on the outside and cooked through inside.
Tips to Make the Best Sausages
Keep everything cold. Cold meat and equipment are the secret to perfect sausage texture. Chill your grinder parts, bowls, and meat before grinding to prevent fat from melting and meat (especially liver) to become mushy!
Don’t skip the fat. Fat adds flavor, moisture, and tenderness. A good sausage typically has about 20–30% fat, though you can adjust based on your preference.
Mix well for the right texture. After adding your seasonings, and chilling the meat, knead or mix the meat until it becomes slightly sticky and cohesive.
Test your seasoning. If you’re unsure about your seasoning mix, taste it! Before stuffing or forming patties, cook a small piece of the sausage mixture in a skillet to check the flavor. Adjust salt or spices if needed.
Avoid under- or overstuffing. If using casings, fill them firmly but not tightly. Overstuffing can make casings burst, while underfilling leads to air pockets. You’ll get a feel for it after a few tries! Once the all casing is filled, you can also gently push the meat around if you have areas that are understuffed and areas that are overstuffed. Just be very gentle so you don’t burst the casing!
If you try these nose-to-tail beef sausages, I’d love to hear from you! Drop me a comment down below, and don’t forget to leave me a 5-star review if you loved this recipe.
Pin it For Later

Related Posts And More Nose-to-Tail Recipes
Nose to Tail Eating: Benefits and Recipes
Organ Meats: List, Health Benefits, and Recipes
The Benefits of Eating Collagen and Gelatin
The Benefits of a Grain-free Diet and What to Eat
Nutrient dense animal foods for pregnancy
Organ Meat Breakfast Sausage Recipe
Steak and Kidney Pie Easy Recipe (Grain-free, Gluten-free)
Slow-Cooked Beef Heart Stew in the Instant Pot
How to Cook the Best Pan-Fried Beef Liver
How to Cook The Best Pan-Seared Beef Heart
Easy Instant Pot Beef Tongue with Italian Salsa Verde
How to Cook Pan-Fried Beef Kidneys
Beef Heart and Kidney Stew (Slow-Cooked in the Instant Pot)
Stuffed Beef Heart With Bacon and Spinach Recipe
Printable Recipe Card
Nose-To-Tail Beef Sausages Recipe
Equipment
- Cutting board and knife(s).
- Meat grinder
- Large mixing bowls.
- Sausage stuffer or stuffer meat grinder attachment (optional, if making links).
- Needle or sausage pricker (optional, if making links).
Ingredients
- 2 lbs (~1kg) beef muscle meat
- 10 oz (~300 g) beef heart
- 9 oz (~250 g) beef tongue
- 3 oz (~85 g) beef liver
- 3 oz (~85 g) beef kidney
- 1 to 1½ lbs (~450 to 680 g) beef fat and collagen scraps
- 4-5 tsp sea salt
- 2-3 tsp black pepper
- 2-3 cloves garlic
- 1-2 tsp dry parsley
- 1 tsp dry sage
- 1 tsp crushed mustard seeds
Instructions
Make the sausages
- Gather and prepare all your ingredients. Weigh the different types of meats and fat, then cut everything into roughly 1-inch cubes. If your meat isn’t already partially frozen, spread the cubes on a tray and place them in the freezer until firm but not completely solid (about 1 hour). Place all your clean bowls and grinder parts in the fridge or freezer to chill as well.
- While you wait, weigh and prepare your seasonings. If using fresh garlic, mince it finely.
- Assemble your meat grinder with the chilled parts, following the manufacturer’s instructions. Use a coarse or medium die for grinding.
- Remove the meat and fat from the freezer and combine them in a large, cold bowl. Mix with clean hands to evenly distribute fat and organ meats.
- Grind all the meat, collecting it in a large, cold bowl or tray.
- Add the seasonings and mix quickly with clean hands to distribute everything evenly. Return the mixture to the fridge or freezer while you wash and sanitize your equipment and surfaces. Place your sausage stuffer parts in the freezer to chill.
- Once everything is ready, mix the sausage mixture again until it becomes homogeneous and slightly sticky. You can mix by hand or use a stand mixer with a paddle or dough hook attachment.
- If you want to make stuffed sausages continue with the next section. If making patties, simply form the mixture into patties with clean, slightly damp hands and place them on a parchment-lined tray. Keep them refrigerated, cook immediately, or freeze (see notes).
Stuff into casings (optional)
- While the sausage mixture rests in the fridge or freezer, prepare your casings. For natural hog casings, rinse thoroughly and soak in warm water for about 15 minutes. Then run warm water through each casing to remove any salt and check for leaks. Follow the specific directions provided with your casings.
- Assemble your sausage stuffer, or use your grinder fitted with the stuffer attachment without the blade and die. Slip a casing all the way onto the stuffing tube, tie a knot at the end, and prick a small hole near the knot to let trapped air escape.
- Gently push the meat mixture through the stuffer, letting it fill the casing as it coils. Adjust the pressure or speed as needed: if air pockets form, decrease speed and/or push casing further in onto the stuffing tube; if it overfills, try increasing speed, and/or sliding the casing closer to the tube’s end.
- Once you reach the end, leave enough casing to tie another knot. Form links at your desired length, alternating the direction of each twist to keep them secure.
- Prick any air bubbles with a sterilized needle or sausage pricker. Your sausages are now ready to cook, refrigerate, or freeze.


Wow, these sound amazing. We butcher our meat every year but have never made our own sausage links. I love this idea. Thank you.
Thank you, Kaitlin! These are gonna taste so good with your own meat, yum!
That is such a great article! I love the recipe and your step-by-step is so helpful. I’ve made lots of sausage in the past using all the scraps after butchering pigs, beef, lambs, and goats. But I never really had a recipe for it. Just winged it, lol. I will keep this one in my files, it sounds awesome.
Hey Heidi, thank you so much. And that’s the whole point of this! All the scraps and whatever you have make the best sausages!! 🙂